It's All Material
Now for a part of blender that is very confusing when you first start using it - materials. It works really, really well after you get the hang of it, but getting the hang of it takes a little time.
The first thing we must do is set up a material for our desktop. Take the following steps:
- Select the plane that represents the desktop
- Click the Shading and Materials buttons

- In the Links and Pipeline tab, click the Add New button
- Give your material a name like "BEECH"
- In the Shaders tab, change the following settings:
- Spec. (Specularity - the amount of shininess) to 0.6
- Hard. (the hardness of the material) to 200
You must always create a material first and then assign the material texture. The texture is just an attribute of the material.
Add Some Texture
One way to establish a texture is by using an image. We want our desktop to look like beech wood, so we need to find an image of beech wood. To find textures, I generally do a Google search with the term "Seamless Texture" and then narrow the search to images. In this case, you would search for "Seamless Texture Beech Wood" or something similar to that. Here is the image I used (right-click and 'Save image as..' to download):
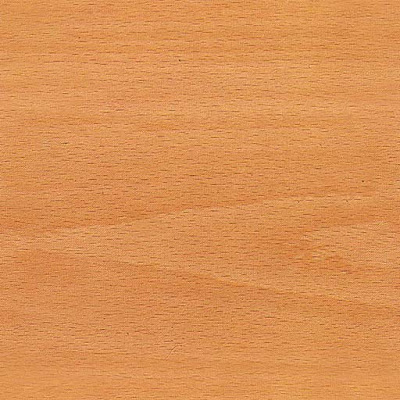
This texture image is not actually seamless, but it doesn't matter since our desktop is all one face.
To use this texture on our desktop, we need to associate it with our material. In the texture tab (usually on the right in the Shader buttons) click the button that says 'Add New'. In the box that appears, type "BEECHTEX" or something similar. This is the name of your texture.
Now we need to assign the texture type. To do so, we need to get to the texture buttons and load our image:
- Click the Shading and Textures buttons:

- In the texture tab, select 'Image' from the Texture Type drop-down
- In the Image tab, click the button that says 'Load' and browse to the beechwood image you downloaded above. Your texture will now show in the preview window
- Return to the Materials buttons:

- In the Map Input tab next to the Texture tab, change sizex, sizey and sizez to a value of 3.0. This is where you scale your texture - the smaller the number the larger the scaling.
TIP:To set a the camera angle quickly, pan and zoom to the view you want and press Ctrl+Alt+Numpad0. To return to the camera view, press Numpad0. When in camera view you can adjust the view by selecting the camera view outline (the solid rectangle around the camera view) and:
- Press 'g' and move the mouse to pan
- Press 'g', click the center mouse wheel and move the mouse to zoom the camera in and out
- Press 'r' to rotate the camera
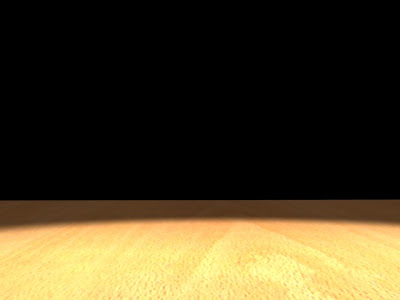
Go ahead and hit the F12 key now and render your desktop. It should look a little like this:

Add Some Texture to Your Texture
You have now got a texture based on an image, but it looks rather flat. We need to use a normal map to make it have personality. A normal map makes a 2-dimensional image appear 3-dimensional. Return to the Texture tab and follow these steps:
- Just below the button on the left that says "BEECHTEX", click the empty texture button
- Use the drop-down button to the left of the "Clear" button to select "BEECHTEX" once more. You now have the image texture "BEECHTEX" referenced twice by your material
- Click the original "BEECHTEX" button and then click the up arrow symbol above the Clear button (note the two buttons highlighted below):

- Now click on your new "BEECHTEX" texture and click the button with the down arrow on it. Steps 3 & 4 copy your texture mappings (like the scaling we set earlier) from one texture to another. You now have to identical textures on the same material
- Click the Map To tab
- Change the following settings:

- Clear the Col (Color) button
- Highlight the Nor (Normal) button
- Highlight the Ne (Negative) button
- Set the Nor (Normal) slider to 2
TIP:What in the world do all of these settings do? The color button (Col) tells the material to derive color (or an image in the case of an image texture) from the texture. The intensity of the color is controlled by the Col (Color) slider. The Normal button (Nor) tells the material to derive it's normal (3D) mapping from the texture. Since light colors are typically mapped as high points in normal maps, we use the Negative (Ne) button to produce a negative of the image to use as the normal map, making the darker parts look lower.
To get a better idea of what the normal map does, crank the normal slider up to 25 and press F12 to render the scene. You should be able to see all kinds of little bumps on the surface. We only need it set to 2 so it picks up little highlights in the scene - we don't want it to look like old barn wood!
You have now completed a material using an image map for both color and normal mappings. Press F12 again and render your scene!


No comments:
Post a Comment