Let's make the pencil model look a little more realistic. In Object Mode, select the pencil and Numpad/ to switch into local view. Tab into edit mode and select the end edgeloop at the tip end of the shaft:
 Extrude it about 1/2 the distance of the wood tip, like so:
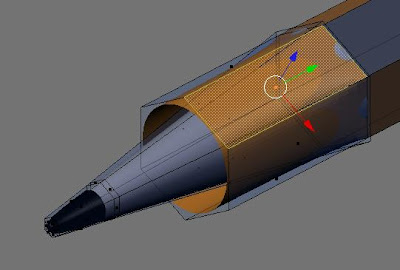
 Select the top face and select the Editing button. In the Link and Materials tab, use the material spinner and select the material to 'YELLOW'. Click the assign button:
 Extrude it about 1/2 the distance of the wood tip, like so:
 Select the top face and select the Editing button. In the Link and Materials tab, use the material spinner and select the material to 'YELLOW'. Click the assign button:
Press 'a' and then select the newest edge loop (Shift + Alt + select). Scale the new edge loop down:
 Press 'a' to deselect all and select the edge loop forming the wooden tip near where it joins the shaft. Scale it down slightly so it looks like this:
 Numpad3 to the side view and select and select the faces of the new cone. The easiest method is to go into face select mode and press 'b' twice to select the faces. Press Shift + 'e' and crease the subsurf to sharpen the edges.
 Now I want to sharpen up the tip a little bit. Select the center vertice of the tip and pull it out a little:
 Now we will add a little inconstancy to the way our sharpener made the point. Select the two vertices shown and drag them toward the tip:
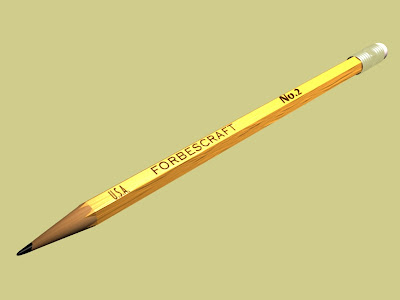
 Go around the tip and randomly pull pairs of vertices forward or back. Do a test render:
 Press 'a' to deselect all and select the edge loop forming the wooden tip near where it joins the shaft. Scale it down slightly so it looks like this:
 Numpad3 to the side view and select and select the faces of the new cone. The easiest method is to go into face select mode and press 'b' twice to select the faces. Press Shift + 'e' and crease the subsurf to sharpen the edges.
 Now I want to sharpen up the tip a little bit. Select the center vertice of the tip and pull it out a little:
 Now we will add a little inconstancy to the way our sharpener made the point. Select the two vertices shown and drag them toward the tip:
 Go around the tip and randomly pull pairs of vertices forward or back. Do a test render:


No comments:
Post a Comment