It may look like the paperclips are the hardest objects to model in the image. It's not true! They are actually very easy to model. We do it with a path extrusion. Start with your scene in top view(Numpad7) and toggle to global view (Numpad/).
In Object mode, add a path (Add>Curve>Path). Tab into Edit Mode. Here is your path:
 Select the vertice on the far right and press 'e' to extrude. While pressing the Ctrl key, extrude the path half way between the major grid lines:

Extrude the path again and then again to round the bend: Select the vertice on the far right and press 'e' to extrude. While pressing the Ctrl key, extrude the path half way between the major grid lines:
 Keep extruding until you got the rough shape you are looking for:
 Now pull a few vertices around to get a more refined shape:
 Now tab into Object Mode and drag your curve close to your pencil. Scale it to a realistic size:
 Tab back into edit mode, select the vertice shown below, and Shift + 's' and Cursor to selection:
Down to the Wire
Tab back into Object Mode and add a Bezier circle at the cursor (Add>Curve>Bezier Circle). This circle will represent the size of the wire on your paperclip, so scale it appropriately:
 With the circle still selected, select the Editing button. In the Link and Materials tab, in the box labeled 'OB:', change the objectname to 'CLIPMESH'. Now select the curve. In the Curve and Surface tab, in the box marked 'BevOb:', enter 'CLIPMESH'. Here's what should happen:
Hmmm... my wire looks a little thick. Easily fixed, though. I just re-select the Bezier circle and scale it:

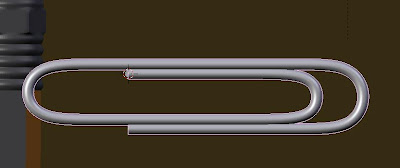
Now that looks like a paperclip! All I have to do is add material. With the paperclip selected, select the Shading and Material buttons. In the Links and Pipeline tab, select 'SILVER' as the material. Done! Check out the render:

 With the circle still selected, select the Editing button. In the Link and Materials tab, in the box labeled 'OB:', change the objectname to 'CLIPMESH'. Now select the curve. In the Curve and Surface tab, in the box marked 'BevOb:', enter 'CLIPMESH'. Here's what should happen:
Hmmm... my wire looks a little thick. Easily fixed, though. I just re-select the Bezier circle and scale it:

Now that looks like a paperclip! All I have to do is add material. With the paperclip selected, select the Shading and Material buttons. In the Links and Pipeline tab, select 'SILVER' as the material. Done! Check out the render:


No comments:
Post a Comment